Looking good.


 Rank 10 - Admin
Looking good.
 Rank 9 - Board Staff
Nice one.
What are you sculpting with?
 Rank 8 - Deluxe Member
Dude... I didn't even think of that till you mentioned it. Damn! XDOriginally Posted by kup
I wouldn't mind taking you up on that offer to be honest
Pulse: Oh too true
autobreadticon : Lol- did you miss out too!?
Kyle: Thanks
Gamblor: SuperSculpey, believe it or not! On the one hand it's nice to sculpt with, on the other I would like it to harden a little so that I can have something of more rigidity... BUT! I've tried a bit of this job with miliput and it's pissin' me off that I just end up leaving finger prints all over it! <_>;;;
Oh well- now! An update!

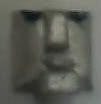

(I am using my phone camera- damn, it's a pain! <_>)
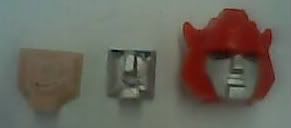
Also, here's a line up
Phailed attempt (where I remembered to give him a bit of a proper jawline) , current one (the weird eye stuff is actually shiney reflections (his left eye)) , and the original head
Last edited by lcz128; 22nd May 2008 at 07:46 PM.
 Rank 8 - Deluxe Member
werent you suppose to heat it a little in the oven if its sculpey? It will set but yeah its still a little soft plasticky thing after. I tried it once to do a G1 Bludgeon helmet, took me 2 tries to get something Im content with. First one I overdid and it came out rather brittle.. Good on yah lcz that looks great, just adjust ( if you still can) the square jaw to an angled one. That must've been really a pain to make, knowing how small the faceplate is for CJ. It would've taken me ages.
Wanted AM partner Vanguard, Myclones Dirge, G1 Victory Leo, e-hobby Dark scream ( the black version), e-hobby Magnificus
Parts- AM partner Basher-side guns, G1 Actionmaster Elite Windmill's blades[I][B]
Rank 8 - Deluxe Member
I actually boil it - work here has one of those instant-hot-water things and so I just put it in my lil Toybiz figure factory crate (which I use to hold water while painting- it's filthy with all the paint now :b) and leave it in there for a good few minutes and it comes out solid
The thing with this is if I make a mistake, it's 'start-from-scratch'. <_<; And I don't think I can cut the jaw to make it angled - once cured, cutting=doom.
I go now to make me a helmet
Rank 9 - Board Staff
I agree with liege, sculpey needs to be baked to harden.
Rank 8 - Deluxe Member
Boiling seems to have worked for me thus far
Fingers crossed...
*edit with a mini kinda-guide to boiling super sculpy*
Helpful ish links:
http://www.he-man.org/forums/boards/...d.php?t=126180
http://www.becircle.com/modifying_yo..._modeling_clay
Personally, here at work I have one of those instant boiling hot water dispensers and so I just dispense some into my plastic container (that I use to hold water for paint as well) then add the piece I'm curing in, cover it and wait for a while. Usually by a few minutes it would be harder, but I tend to leave it and go away for a while. After that, I drain the water and repeat the process just to be sure.
It's worked for me thus far, and I don't really want to put my toys in anything I would use to cook food - like a pot. :b
Last edited by lcz128; 25th May 2008 at 02:53 PM.
Rank 8 - Deluxe Member
O yeh!
Found an upgrade idea while trolling the custom boards and now I've done it for myself.
Head was made from parts of that jetski-thing of his with the paint stripped, and the gun is from a micromaster playset thing- the blue APC looking thing with a giant cannon. (I'm sure someone here knows what it's called). It's really just a placeholder till I get my Big Guns from that Landcross set
Tell me what ya think!
Current Wants: Shadow Scyther
 Posting Permissions

 Reply With Quote