
This is really interesting... nice work.
The older one can be the battle damage version


 Rank 8 - Deluxe Member
This is really interesting... nice work.
The older one can be the battle damage version

 Rank 9 - Board Staff
I don't use mould release because it leaves residue on the parts. What about using a slower curing resin? I use Barnes easy cast which has a mix time of 2 minutes and demould of 10 minutes. I always get bubbles with that stuff. I also have a clear resin which I haven't tried yet but it has a mix time of 30 minutes and demould of 3+ hours. I'm sure that most of the bubbles would dissipate by then.Originally Posted by Soviet Fox

Rank 3 - Basic Member
+1 for the longer demould time. That will help imensely. Eventually. There are about 10 different resins (besides clear) not counting the obesity they order in. Resin goes a long way especially compare to silicone. Don't want to have too many resins on the shelf or it will go off.
 Rank 8 - Deluxe Member
Rank 3 - Basic Member
Rank 8 - Deluxe Member
Rank 3 - Basic Member
That's some good work !!!
Will have to use your tutorial in future to make some casts myself !!!
Rank 3 - Basic Member
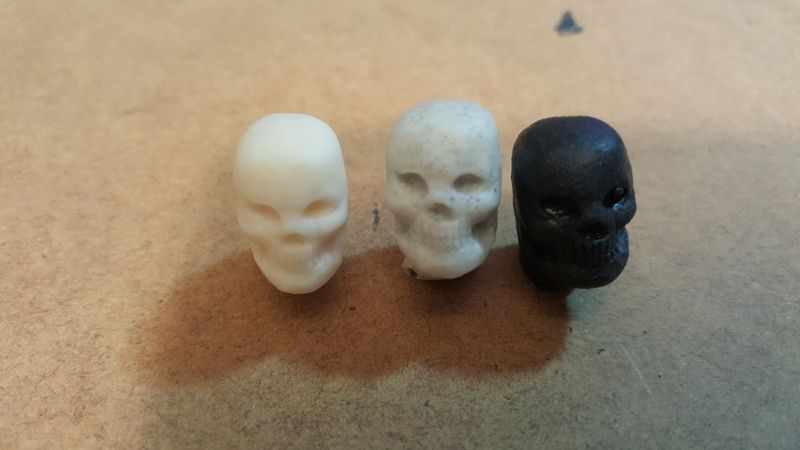
Colouring
I got impatient and tried acrylic black paint. (Very small amounts)
then I bought proper pigment. all the photos of prep are with proper pigment. The acrylic caused a chemical reaction where it frothed over, the casts came out eventually but took forever to cure.
NOTE It is not recommended to use acrylic unless you are willing to risk your mould being ruined.
as a "happy little accident" the acrylic came out looking like concrete, it will be a great method of casting statues.
The pigment is STRONG. I am going to have another go using even less and try to get a grey. might need to use a little bit of white as well.
 Rank 8 - Deluxe Member
In case this hasn't been said - you have a lot of PATIENCE.
Rank 3 - Basic Member
Ha, my partner would disagree.
I use the skulls as a test cast, I pull that out when I think it's done, If it squishes, I give it another hour.
And Iv'e been hanging out something fierce for my vacuum chamber and pressure pot. still a couple of weeks away from that I think.
Going to pick up wax this weekend though which is cool
 Posting Permissions


 Reply With Quote


